
Do you know a little JavaScript and HTML? Be sure the page is safe before you put in your credit card number – especially if you want the product and don’t know the vendor.
You can audit the page’s security for yourself, especially if it uses Stripe. The early parts of the post are useful to check any payment processor.
I assume you know some HTML and JavaScript. We’ll audit in order of importance. Start from the top.
Security
First, are they using HTTPS? Look for the green lock, green bar or equivalent for your browser.
Short version: no lock, no buy. You can skip to the next section if the lock is green.
No lock? They shouldn’t be accepting your credit card number, full stop. Anything they send can be changed in transit without detection.
If they’re using HTTPS but with a red or crossed-out lock, find out why. Mouseover or use WhyNoPadlock? (type the URL and hit “check”).
A self-signed certificate is unusual but okay — especially if you’re buying from another developer, who may not want to pay for an SSL cert. Insecure components on the page aren’t great. It’s hard for sites that scripts, ads and sharing buttons are often insecure. But the best sites have no insecure components, whether it’s a developer running them or not.
Insecure components are a security liability.
JavaScript and Page Source
Now let’s dig in.
We’ll use https://rebuilding-rails.com/payment_page.html as an example.
See that green lock? So far, so good. Next, we check the code.
View the page source. Search for “stripe”. Specifically, look for this:
<script type="text/javascript" src="https://js.stripe.com/v1/"></script>
If you can’t find it, even in any sub-pages, the merchant probably isn’t using Stripe. Then the rest of this post can’t help you. You can check dev tools like “Scripts” or “Resources” and double-check, though that doesn’t work if they’re combining all the page JavaScript.
If you’re really hard core, check the combined page JavaScript for “stripe” to be sure.
The Form
Now that you’re sure they’re using Stripe, we’ll compare what the page does with Stripe’s how to build a payment form tutorial to make sure they got the important parts right.
Find the form where you type payment information. You can “Inspect element” to find it in most browsers. Then in the page source, find it by the id or class.
On rebuilding-rails.com, for instance, you should look for “submit_payment” in the page source.
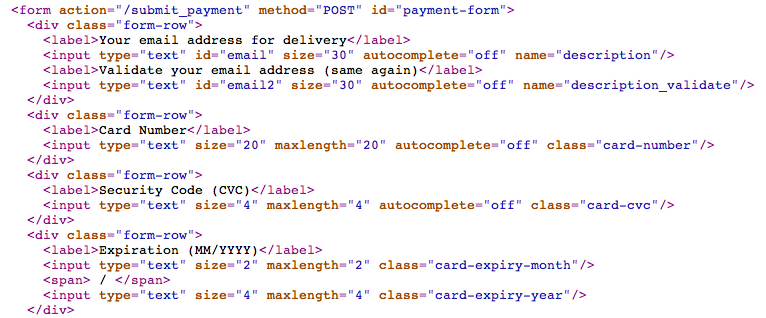
Names Have Power
The really important thing in this form is: name is not set for sensitive information. Your card number and expiration date should not have a ‘name’ in the page source.
Normally with Stripe your credit card number is in your browser and gets sent to Stripe.com, but rebuilding-rails.com won’t ever see it. Name in an input says “send this to the server”. So if you see <input name=‘credit-card-number’ in the form, that means the server is getting all your information. Not good.
No name means “you can use it here on this page, but nowhere else.” That’s the right way.
A class is fine for your credit card number, expiration and CVC (security code). The class is how this page will find them (only in your browser). Only a name or explicit JavaScript will send to the server.
Code, Code, Code
Let’s dig in deeper.
What else does the page do with your information? You found the class of the inputs for your information. In rebuilding-rails.com, it’s class “card-number”. So look through the page source and see where else that gets used.
On rebuilding-rails.com, the code looks like this:
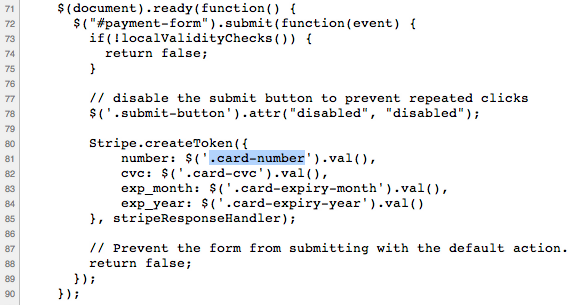
You can see that rebuilding-rails.com does some kind of “local validity checks” – that’s exactly the kind of thing to check, and we will later.
Stripe.createToken() is the one thing that every Stripe site should do with your information and you want them to. That makes sure that Stripe can bill you without the site seeing your info.
And as you can see, that’s it. Once you’ve checked the token, the page is safe and doing the right thing… As far as you can see.
Malevolence
None of this means the page is really secure. But it means the part you can see is done right, and that’s a good sign. It also means they aren’t getting around Stripe to steal your information… If you did a good job auditing them!
Safety
In the end, none of this replaces checking your credit card statements. But it’s nice to be able to see when something is done wrong.
If it’s wrong, don’t risk it!
Are you the kind of Do-It-Yourself Programmer that wants to be able to audit page source yourself? Or write your own framework? My book, Rebuilding-Rails, can help you build your own web framework. Nobody audits the code as well as the guy who can build it from scratch.
Comments