It’s fun to write about different ways to practice coding. But “how to practice” only gets you so far - at some point you have to actually do the practice.
There are a lot of neat programming exercises in the world. This is an example of one I call a “coding study”, and I think it fits my definition of a good exercise.
A coding study is like an artist’s life study, but for code. You’d normally pick your own design. But this is meant as a simple introduction, so I’ll suggest a little more than usual.
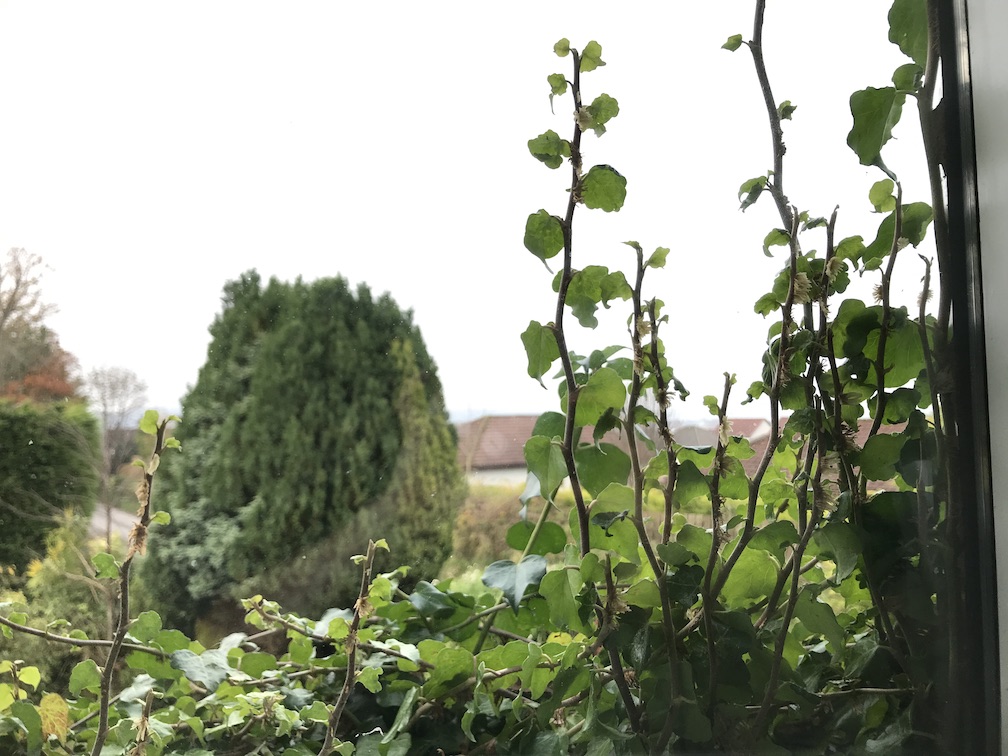
The theme today: ivy on a window. I’ll refer to the picture below repeatedly in this post - have a look, then scroll back here as needed or save a copy locally.
One hard thing about exercises is that you need different habits for them than for production code: you’re not trying to write polished, production code. Instead, you’re trying to learn as fast as possible. So at the end, I’ll talk about some intentionally weird things I do in this code and why.
The Definition
For this blog post, I’ll spell out one specific way to turn the picture above into an interesting coding exercise — though I’m actually a big fan of trying multiple ways to maximise learning.
When I look at that picture, and the window next to me in Inverness where I took it, I notice a few interesting things about the ivy. First, it has a strong left-right-left back and forth look to each strand, punctuated by a little leaf. I think that’s fun, so I’ll emphasise that as something I’m playing with. I think the way the leaves start large at the bottom but get smaller higher up is fun, but I’m planning to use ASCII-art display for this to keep the complexity down, so I’m not sure if I’ll do that. And I like the way that each strand goes sideways for a little while before turning upward gradually. That’s also a bit hard to express in code, in a good way.
That gives me set of features that are each slightly annoying to express in code, which means I’m likely to learn something interesting. Perfect.
If you were to come back to this task (“generate an ivy structure and express it as ASCII art”), you might pick different features of the picture as interesting — for instance, I’m ignoring the way the ivy grows little bunches of tiny rootlets, and the crossing of many lower-down sources of ivy, and I’m not paying attention to the lighting. All those are potentially interesting. But I started with the first few interesting things I saw. You could pick a different set.
For those familiar with coding studies, I’m using Ruby and ASCII art display (the Tool) to do the above (the Task) in order to play with the interaction of those dynamics in a simulation (the Purpose.) I’ve written this out before writing any code, since you should record your idea before doing the exercise.
The Beginning
For an exercise, it’s really useful to start simple and work in stages. I don’t need any kind of fancy display to play with ivy-growth dynamics so I’ll just print my results as ASCII art.
So I’ll start with a grid in memory and print it out. Let’s start with a simple ivy growing left-right, upward.
grid = (0..9).map { [" "] * 30 }  # 10 lines of 30 spaces each
tips = [ { y: 9, x: 15, dir: -1, height: 8 } ]

still_growing = true
while still_growing
  still_growing = false
  tips.each do |tip|
    next if tip[:height] < 1
    next if tip[:y] < 0
    still_growing = true

    distance = tip[:dir]
    if tip[:dir] == -1
      pic = "\\"
    else
      pic = "/"
    end

    grid[tip[:y]][tip[:x]] = pic
    tip[:y] -= 1
    tip[:height] -= 1
    tip[:dir] = -tip[:dir]
  end
end

# Print the grid
grid.each { |line| puts line.join("") }
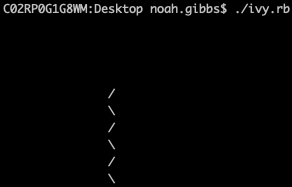
That’s not too bad. It should start low and grow left and right, back and forth. I set a maximum height to keep it from growing off the top of the ‘screen’, though I could have skipped that. Here’s what it looks like:
I actually skipped several ways to do this more simply. For instance, I could have hardcoded one tip instead of having an array first - that would be fine. I could have skipped still_growing and having a height. I could have started without even alternating left-right. Pick your level of comfort and start there. But I’m not going to make all you blog readers sit through every step!
I also saved a copy of the code after this. If you’re not using source control for your coding exercises, it’s good to save a copy periodically, which is easy. If you are using source control, that’s great too.
I said I was interested in the left-right motion of the ivy, so that’s fun. I also said I was interested in the leaves and how they started large and got smaller. So let’s add that.
A few minutes in, here’s what I have for that:
grid = (0..9).map { [" "] * 30 }  # 10 lines of 30 spaces each
tips = [ { y: 9, x: 15, dir: -1, height: 8 } ]

still_growing = true
while still_growing
  still_growing = false
  tips.each do |tip|
    next if tip[:height] < 1
    next if tip[:y] < 0
    still_growing = true

    if tip[:height] >= 7
      leaf = "(_)"
    elsif tip[:height] >= 4
      leaf = " O "
    else
      leaf = " o "
    end

    stem = "__"

    distance = tip[:dir]
    if tip[:dir] == -1
      trunk = "\\"
      leaf_offset = +2
      stem_offset = -2
    else
      trunk = "/"
      leaf_offset = -4
      stem_offset = +1
    end

    grid[tip[:y]][tip[:x]] = trunk
    grid[tip[:y]][tip[:x] + stem_offset] = stem[0]
    grid[tip[:y]][tip[:x] + stem_offset + 1] = stem[1]
    grid[tip[:y]][tip[:x] + leaf_offset] = leaf[0]
    grid[tip[:y]][tip[:x] + leaf_offset + 1] = leaf[1]
    grid[tip[:y]][tip[:x] + leaf_offset + 2] = leaf[2]
    tip[:y] -= 1
    tip[:height] -= 1
    tip[:dir] = -tip[:dir]
  end
end

# Print the grid
grid.each { |line| puts line.join("") }
That’s a lot more lines. Let’s talk about what changed.
First off, I picked an ASCII-art leaf based on the height - which in this case means height remaining, so it’s largest near the bottom of a frond of ivy, and smallest near the top, just like the leaves.
I also have a stem. And I renamed “pic” to “trunk” — to remind myself what it is. I then have a fairly annoying chunk of code to copy two characters of stem and three of leaf into place at a particular offset. Would it be better to come up with more complicated logic to handle arbitrary-length strings? Probably not, no, since this worked quickly — I’ll discuss that later in the post.
The numbers for the offsets are a bit “magical” because I tried something reasonable and didn’t like how it looked, then messed with them a bit. Here’s what they look like if you just try plus or minus two for them:
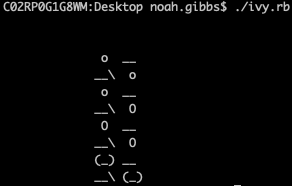
Not great, is it? And that’s part of keeping things loose and playing with the code. Start simple and build.
Here’s what it looked like after I changed the offsets a bit:
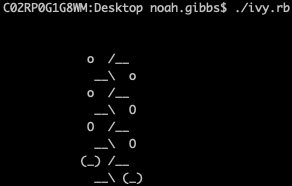
I like this version a lot better.
Now, I said I also wanted to play with the fact that the ivy moves sideways a bit. And I had it in the back of my mind that perhaps I’d have multiple of them branch out from a single lower trunk, which you can see on the picture up above. In fact, it’s not a bad idea to look at the ivy again at this point — I have a few times as I work, to see if I like the picture of it that I’m making.
So: let’s try to get a nice payoff from that loop we’ve been dragging around since the beginning. I try that… And then fail, actually, and realise my initial technique on this doesn’t work. So I revert back to an earlier copy of my code and start from it again. That’s fine.
After a few minutes, here’s what I wind up with:
grid = (0..12).map { [" "] * 30 }  # 10 lines of 30 spaces each
tips = [
  { y: 12, x: 8, dir: -1, speed: -2, height: 7 },
  { y: 12, x: 15, dir: 1, speed: 1, height: 10 },
  { y: 12, x: 20, dir: 1, speed: 3, height: 8 },
]

still_growing = true
while still_growing
  still_growing = false
  tips.each do |tip|
    next if tip[:height] < 1
    next if tip[:y] < 0
    still_growing = true

    if tip[:height] >= 7
      leaf = "(_)"
    elsif tip[:height] >= 4
      leaf = " O "
    else
      leaf = " o "
    end

    stem = "__"

    distance = tip[:dir]
    if tip[:dir] == -1
      trunk = "\\"
      leaf_offset = +2
      stem_offset = -2
    else
      trunk = "/"
      leaf_offset = -4
      stem_offset = +1
    end

    grid[tip[:y]][tip[:x]] = trunk
    grid[tip[:y]][tip[:x] + stem_offset] = stem[0]
    grid[tip[:y]][tip[:x] + stem_offset + 1] = stem[1]
    grid[tip[:y]][tip[:x] + leaf_offset] = leaf[0]
    grid[tip[:y]][tip[:x] + leaf_offset + 1] = leaf[1]
    grid[tip[:y]][tip[:x] + leaf_offset + 2] = leaf[2]

    tip[:y] -= 1
    tip[:x] += tip[:speed]
    if tip[:speed] >= 1
      tip[:speed] -= 1
    elsif tip[:speed] <= -1
      tip[:speed] += 1
    end
    tip[:height] -= 1
    tip[:dir] = -tip[:dir]
  end
end

# Print the grid
grid.each { |line| puts line.join("") }
What changed? I used three tips, not just one. I added a “speed” to each one to have it drift left or right as it climbed. I had that speed decrease — looking at the ivy, they tend toward just being up-down, and just have a sideways drift toward the bottom and I wanted mine to do that too.
I also added a bit to the height. This was fun, and I wanted slightly taller, larger ivy. And I got it. Here’s what this code prints:
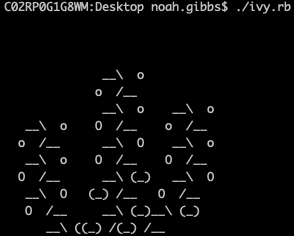
So, success! I’ve explored what I wanted to explore, and explained the exercise to you. This probably took me between 30 and 45 minutes all told, and I learned a bit — the first attempt at “speed,” in particular, reminded me of some things not to do. Failures tend to teach more than successes, as long as you do both quickly.
Weird Things About Small, Fast Exercises
You probably noticed a few things I did “wrong,” or just in unexpected ways, above. Let’s talk about that.
Obviously I was writing in a hurry. That’s mostly because I was writing this to play with the structure of the ivy - anything in the code that wasn’t about that, I pretty much ignored. Careful library to spacially place rectangle-shaped ASCII art? Nope, that would be as large as the code I wrote for this whole post. Careful representation of position and size? Nope, that would also have taken long enough that it wouldn’t be worth it.
That’s why you see cut-and-paste code when there are five characters to copy into place - two assignments for one thing and three for another isn’t enough reason to add complexity with a loop. And why the “if” statements never get collapsed into a math problem meant to represent the leaf placement — that leaf placement isn’t really the point, so a simple, arbitrary-looking “if” is perfect. There are a few specific things that are the point of the exercise, and everything else gets as little attention as possible.
If you have a small, bounded exercise that you’re planning to learn from but not share with anybody else, you should be very suspicious of abstractions, “helpers,” method definitions, and even most forms of good practice and clean code. Most of us are told about how to write clean code in a professional setting, with guidelines like “code is read far more often than it is written” and “write it to communicate with a human, who could be you in six months.” This code won’t be re-read often, and it will be long-abandoned in six months. Unless you’re specifically exploring something about one particular abstraction or about readability as your one single idea for this code, you should skip them.
That’s also why I emphasise “save a copy of your code” over “source control.” In a professional setting, you should always use source control. When it’s you on your own, the overhead may be more than is worth it. It’s up to you. And it’s important to be thinking about the tradeoff — does this piece of professionalism help me here more than it costs me? You’re building an alternate set of habits to use for maximum learning, not maximum polished, usable code.-
There are times and places to practice normal professional programming discipline — at work, on open-source projects or on long-term hobby projects. Most of us never really escape that setting. And so we never learn the things that are hard to learn outside of them.
I’m doing my best to explore and explain some of the interesting space for coding exercises that exists outside of those boundaries. If you think that’s interesting, please sign up for my email list or have a look at my book about software technique. I think there’s a lot of room for us to collectively get better at this. I hope you do too.

Comments